Year 10+ Plane Geometry
Chapters
Enlargement
Enlargement

Enlargement is making something bigger (or smaller), while still keeping the angles and the relative lengths of lines, and sizes of regions, the same. Things that have
been enlarged look the same - just bigger or smaller.
Some other words for enlargement are resizing, dilation, contraction, expansion
and embiggifying. OK, that last one isn't really a word! All of these words are talking about exactly the same operation: changing the size of a geometric
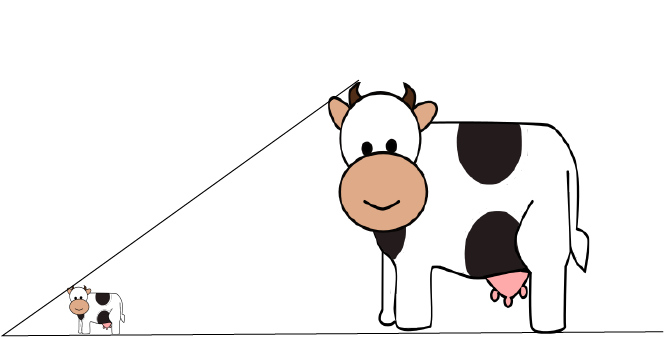
object while still keeping all the angles and relative sizes of parts of the object the same. In the diagram, Alice the cow's face takes up the same fraction of each picture.
To keep the angles, and the relative sizes of parts of the object the same, we have to change the size of the object by the same amount in all directions. Have you ever looked at yourself in the hall of mirrors at a fun fair? You look so strange in those mirrors because they enlarge different parts of you by different amounts in different directions. You can get a bit of the same idea by looking at these pictures of Alice the cow in which she has been enlarged in only one direction. In the first one, Alice is starting to look more like a dachshund than a cow because she's only been enlarged in the horizontal direction:

In the second picture, she's only been enlarged in the vertical direction, so her proportions are approaching those of a giraffe!

Do your own Enlargement

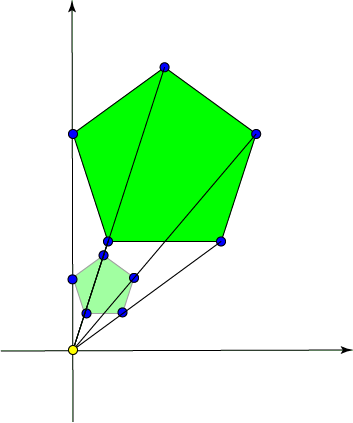
To resize a polygon (a flat shape with straight edges), choose a central point and perform these steps for every vertex (corner) in the shape:
- Draw a line from the central point to the vertex.
- Extend (or decrease) the line so that it is equal to some fixed number times the length of the original line (use the same fixed amount for each vertex).
- Draw a dot where the new vertex will go.
Scale Factor
The steps listed above included changing the length of each line from the central point to a vertex by the same, fixed, multiple. This fixed multiple is
called a scale factor.
For example, in the picture above, I chose a scale factor of \(3\). Each line from the central point to a vertex of the enlarged shape is three times as long as the line from the central point to the corresponding vertex of the original shape. The length of each side of my new enlarged shape is three times the length of the corresponding side of the original shape.
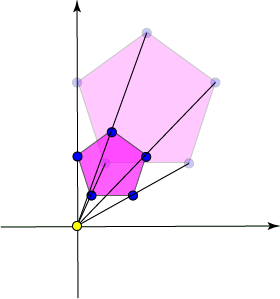
In the picture below, I've used a scale factor of one half. Each vertex of the new (darker) shape is only half as far away from the central point as the corresponding vertex in the original shape. The length of each side of the new shape is equal to one half the length of the corresponding side of the original shape.

Conclusion
Why not have a go at enlarging some polygons yourself, without using the photocopier! Just make sure you use a ruler to measure the distances, and enlarge everything direction by the same amount. When you're finished, you can use a protractor to check that all the angles are the same as in the original polygon. Have fun!
Description
In these chapters you will learn about plane geometry topics such as
- Area (Irregular polygons, plane shapes etc)
- Perimeter
- Conic sections (Circle, Ellipse, Hyperbola etc)
- Polygons (Congruent, polygons, similar, triangles etc)
- Transformations and symmetry (Reflection, symmetry, transformations etc)
etc
Even though these chapters are marked for Year 10 or higher students, several topics are for students in Year 8 or higher
Audience
Year 10 or higher, suitable for Year 8 + students as well.
Learning Objectives
Learn about Plane Geometry
Author: Subject Coach
Added on: 28th Sep 2018
You must be logged in as Student to ask a Question.
None just yet!