HP Quality Center - Quickly get started
Chapters
How to integrate ALM with Quality Center
The QTP automation scripts can be executed from Quality Center. First lets install the tools necessary for that to happen.
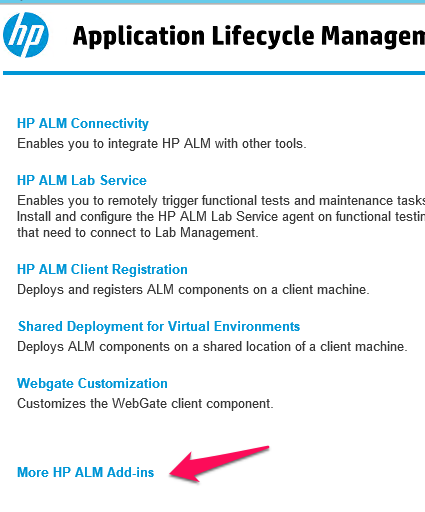
Step 1: Go to HP ALM home page and click on Tools link as shown below

Click on More HP ALM Add-ins
Click on Addins button at the top of the page and then we have to install the QuickTest Professional addin. For "Unified Functional testing", choose the UFT addin.

Once you are through installing above addins, next thing is to create a connection from QC to ALM,
From QC, Goto ALM => Select ALM Connection

Enter the Server URL, User Name and Password, Click Connect.

If the URL is correct, the credentials dialog displays.

On HP ALM Connection is successful, user need to save the Driver Script in Quality Center. Select HP ALM/QC Plan as shown

Once the test is saved, user can see the in HP ALM where the test type is shown as "Quick Test".
On Navigating to "Test Script", Related Tabs will appears only if the test type is of "Quick Test", Script show in QTP screen will be displayed in Quality Center as well. The other necessary component that is required for script execution are Library files which are placed under "Test Resources" Folder.

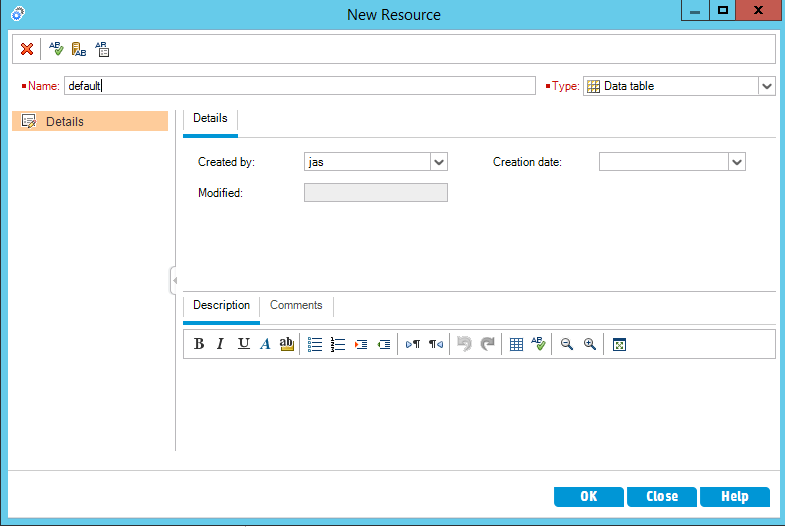
User can be added new Function Library file by creating a new resource of type ".qfl" or ".vbs”.
The Added new library file can be accessed in quality Center using resource Viewer. The Next dependent components for any script execution is "Object Repository" which is again placed inside "Resources" section.

The added Object Repository and its property can be viewed using "Resource Viewer" in QTP.
The Data table has parameterized data setup also is placed in Quality Center under "Test Resources" section.
The added data Table can also be viewed using in "Resource Viewer".
The Data table can now also be mapped to the test settings so that they can be picked while executing. The same can be done using "Settings" of "File" Menu. The Test Settings dialog opens up. Navigate to Resources Tab and select the Data table that we added before. After we are done with this, user can access those test resources that are uploaded in Quality Center in QTP script as shown. The Libraries files and Object Repositories are bind dynamically.
This will allows QTP to interact with Quality Center. Go to "Tools" >> "Options", Now, select "Allow other HP products to run tests and components" as shown.

The Next thing we want to do is to add the test in "Test Lab" and execute. The Procedure will Add tests into Test Lab remains the same as that of manual tests. Upon Clicking on "Run", the automatic runners open and enable "Run all test locally" and hit "Run". Once executions is complete, the test result is displayed on the same "Automatic Runner" dialog box. In Test Lab QTP report is loaded automatically. Users can view reports for more details of the test execution.
Description
Contents of this tutorial includes parts below
- What id HP Quality Center
- Environment Set up
- Configurations on Server Side
- Getting to know some commonly used features
- Management Tab
- Requirements
- Test Plan
- Test Lab
- Integrating QTP with QC
- Defects
- Dashboard Analysis
- Customization
This tutorial is to the point effort to quickly get you started with HP quality center.
Audience
Students looking to get started with HP Quality Center
Learning Objectives
Quickly familiarize yourself with HP Quality Center
Author: Subject Coach
Added on: 23rd Mar 2015
You must be logged in as Student to ask a Question.
None just yet!